If you don’t want a full tutorial, and just look for an example, here is a link to the repository with the final config files: https://github.com/FirefoxMetzger/sso_example
The setup I am presenting here works on localhost, and is mainly aimed at local development. It is a Docker-based setup, so there are tons of existing tutorials for deployment. Another thing that you may want to look into is hardening (making things super secure). I left this part out (for the most part) to avoid distraction; I really just want to focus on getting SSO up and running.
Setup Auth0
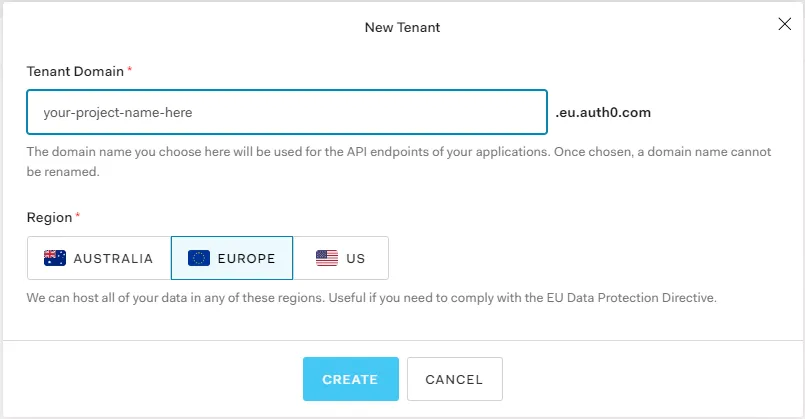
The first step is to set up Auth0 and create a new tenant. Make sure to pick a region that is close to your physical location; this will affect the login speed, but also how the data you send to Auth0 will be handled (data laws).
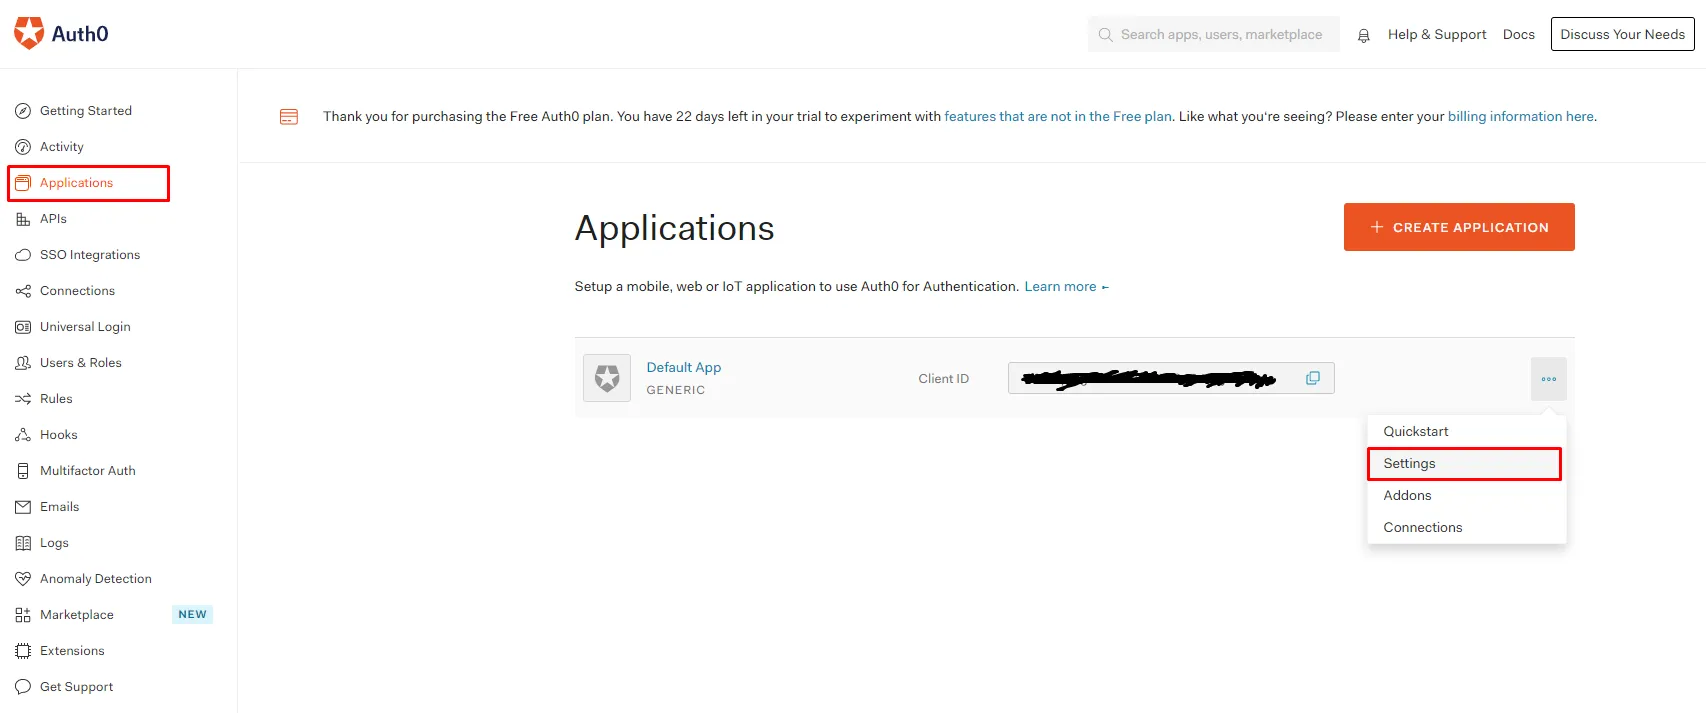
Currently (2020), this will create a default app and enable authentication via email/password and google as a social login provider. We will use this default app. You can of course customize, but I recommend you first set it up following this tutorial, and then add your customization afterward.
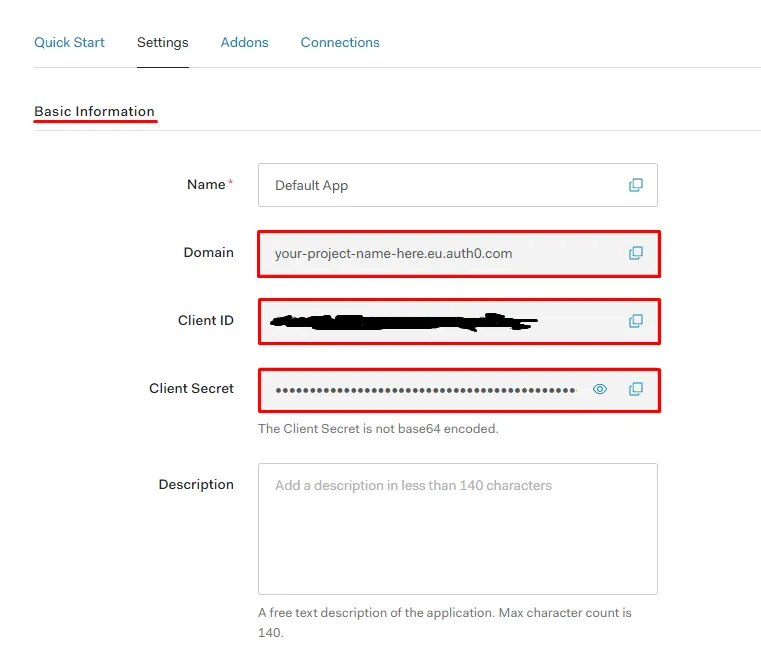
Next, we will navigate to the settings of the default app.
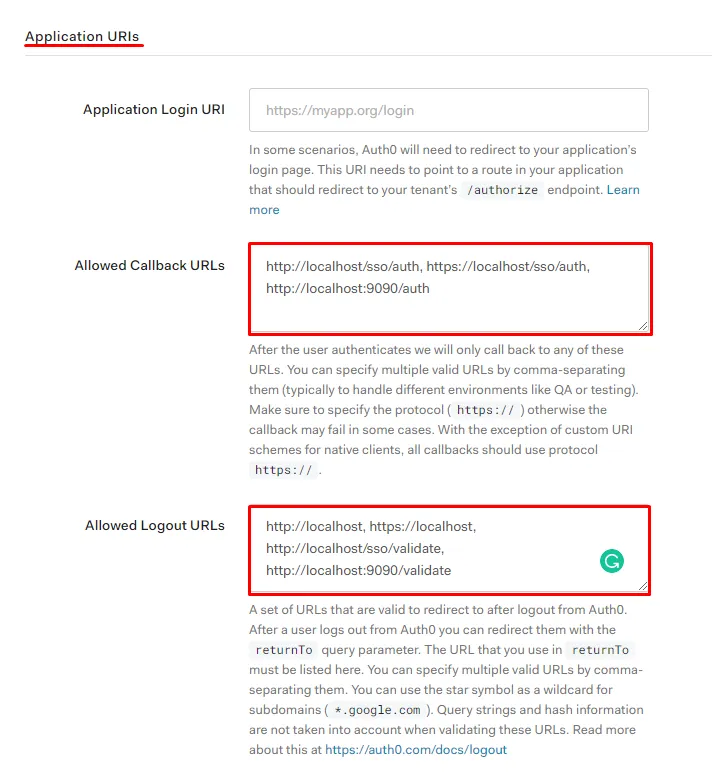
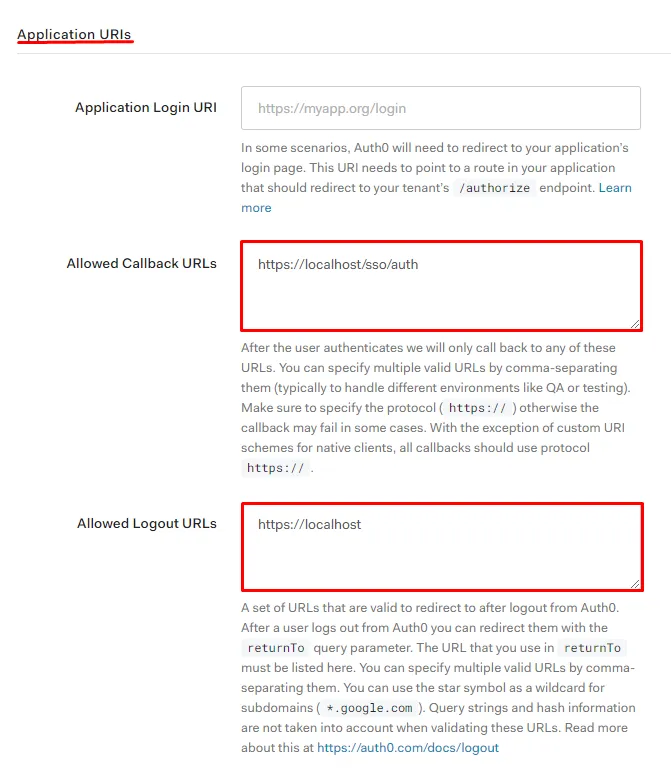
There are a few useful items in the settings which we will need, but the first thing is to allow users of our app to log in and log out. For this, we need to tell Auth0 which URLs are okay to use as callbacks for both login (Allowed Callback URLs) and logout (Allowed Logout URLs).
Navigate to Application URIs. For Allowed Callback URLs add http://localhost/sso/auth, https://localhost/sso/auth, http://localhost:9090/auth . For allowed logout URLs add http://localhost, https://localhost, http://localhost/sso/validate, http://localhost:9090/validate .
Make sure to hit save changes at the bottom of the page.
We will delete most of these URLs as we move along, and they mainly exist for testing (so that we can assemble this incrementally). The two HTTPS URLs are the final ones, that we will use when we are done. The URLs on port 9090 are for testing vouch-proxy, which by default runs on port 9090, and the remaining HTTP URLs are for testing nginx as a reverse proxy for vouch-proxy and your app.
While we are now done with the setup for Auth0, don’t leave the settings page yet. At the top of the page you can find the applications domain, client ID and the client secret. We will need this info in the next steps, so keep it around.
Setup Vouch-Proxy
Vouch-Proxy can almost run out of the box and all we need to do is add a config file. It follows the example for a generic OIDC provider, which you can find on the vouch-proxy repo. I made some modifications to make it work with Auth0.
When you use this template, be sure to replace the Auth0 domain with your domain, replace the client ID with your client ID, and replace the client secret with your client secret.
# vouch config
# bare minimum to get vouch running with OpenID Connect (such as okta)

vouch:
  logLevel: debug
  testing: true
  listen: 0.0.0.0
  port: 9090
  allowAllUsers: true

  jwt:
    secret: Your-64-character-secret-key-here
    issuer: Vouch
    compress: false

  cookie:
    name: my-vouch-ct
    secure: false
    domain: localhost

  headers:
    jwt: X-Vouch-Token
    querystring: access_token
    redirect: X-Vouch-Requested-URI
    accesstoken: X-Vouch-IdP-AccessToken
    idtoken: X-Vouch-IdP-IdToken

  post_logout_redirect_uris:
    – https://your-project-name-here.eu.auth0.com/v2/logout?client_id={client_id_from_auth0}&returnTo=http://localhost/

oauth:
  # Generic OpenID Connect
  # including okta
  provider: oidc
  client_id: {client_id_from_auth0}
  client_secret: {client_secret_from_auth0}
  auth_url: https://your-project-name-here.eu.auth0.com/authorize
  token_url: https://your-project-name-here.eu.auth0.com/oauth/token
  user_info_url: https://your-project-name-here.eu.auth0.com/userinfo
  scopes:
    – openid
    – email
    – profile
  callback_url: http://localhost:9090/auth
To store this file, in your project’s folder create a sub-folder named vouch and in it another one named config. The relative path (from the project root) to the file is ./vouch/config/config.yml. You can check the GitHub repo for reference.
Next, it is time to test if vouch-proxy can correctly communicate with Auth0. I promised a dockerized setup, so let’s create a docker-compose file. (We will expand this file later.)
version: '3'

services:
    vouch:
        image: voucher/vouch-proxy
        volumes:
            – ./vouch/config/config.yml:/config/config.yml
        ports:
            – 9090:9090
Save the file in the project’s root directory as docker-compose.yml. Then, navigate to the root directory and bring up the “stack” with a
docker-compose upOnce it is up and running, you can open your browser and navigate to localhost:9090. You should be greeted with a
404 page not foundThis is expected, so don’t worry; it’s merely a test if the server is alive (page not found >> Site can’t be reached).
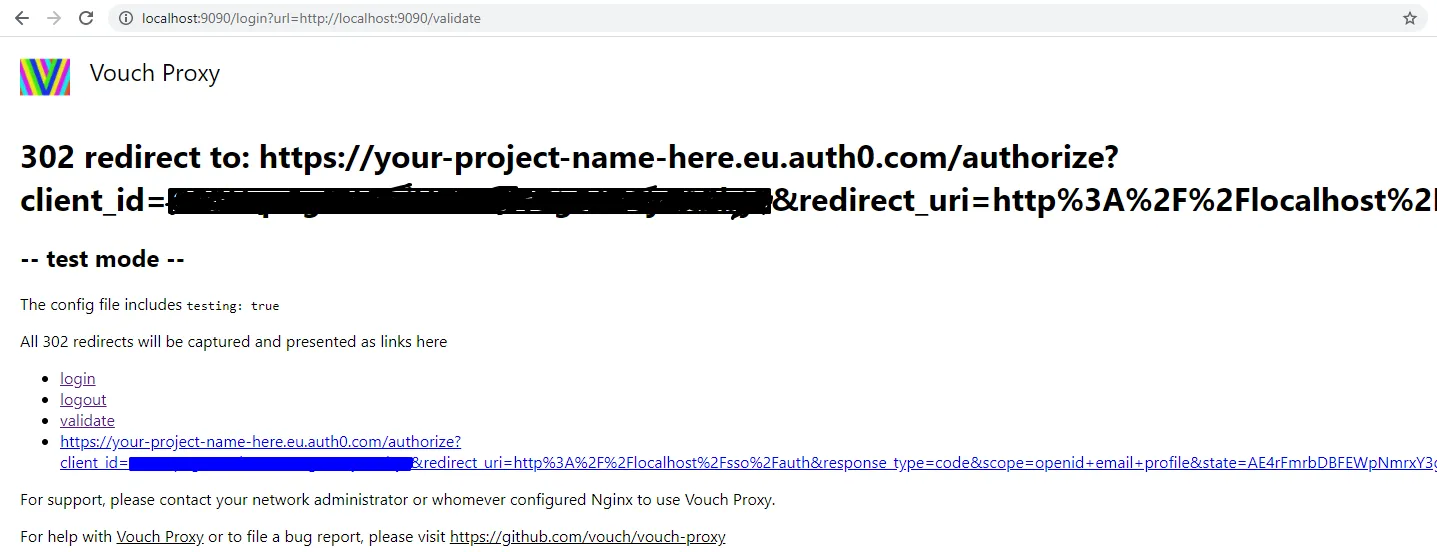
Next, we will test the login flow between vouch-proxy and Auth0. For this navigate to
http://localhost:9090/login?url=http://localhost:9090/validateThe url= parameter specifies the location that we want the user to return to after the login has completed. In this case, we navigate to /validate, which is the endpoint we will use throughout the app to validate the client’s access token.
Once you put that into your browser, you will be greeted by a simple HTML page telling you that you are being redirected to some address. This is vouch-proxy’s debug mode which lets you check if your flow works correctly. Click the long link that forwards to Auth0.
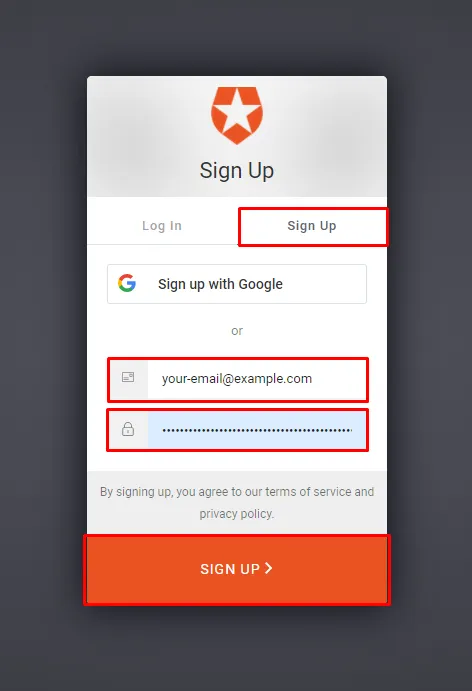
This should present you with Auth0’s login form. Here we want to create a new user with username and password and authenticate ourselves.
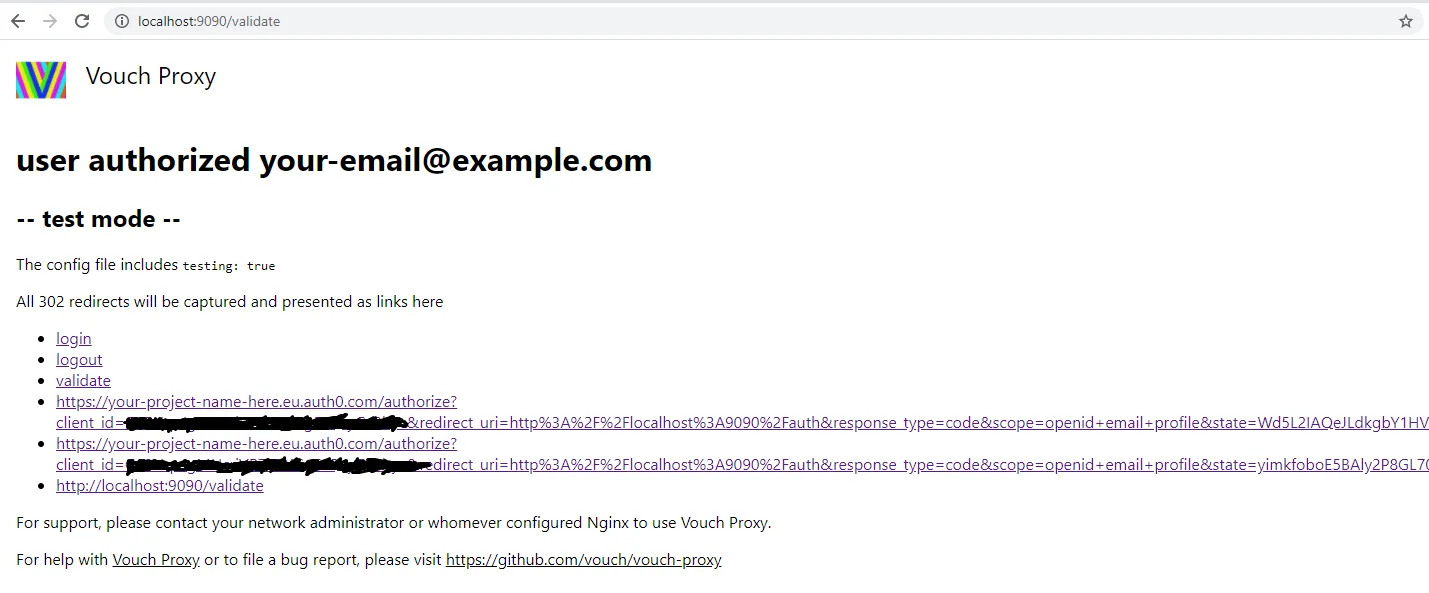
Once you have an account and have accepted the permissions, you will be redirected to vouch-proxy and it will confirm that you are logged in with your chosen email.
Now the only thing to test is to logout the user. Here there are multiple options. (1) You can log out the user from your app (vouch-proxy), (2) log the user out of your app and Auth0, or (3) you can log the user out of your app, Auth0, and their social login provider (if they use a social login). We will not cover the third one here.
To use the first option navigate to
localhost:9090/logoutwhich will tell you that you have been logged out. At this point, you are still logged in at Auth0, so after logging back into the app ( http://localhost:9090/login?url=http://localhost:9090/validate ), you will not be asked to log in at Auth0.
To log yourself out of Auth0 in parallel with your app, you have to tell vouch-proxy to redirect the user to the logout URL of Auth0. You can read more about it here. To logout in both places, use the URL below.
http://localhost:9090/logout?url=https://dev-simple.eu.auth0.com/v2/logout?client_id={client_id_from_auth0}%26returnTo=http://localhost:9090/validateBe sure to replace {client_id_from_auth0} with your client ID. Also, notice the percent encoding of the ampersand (%26), which, if left out, will break the logout procedure. If you log out with this link, and try to log in again, you will be asked to provide your username and password at Auth0 again.
Behind the scenes there are two places where this callback needs to be authorized (otherwise it won’t happen). First, vouch-proxy needs to find the url= parameter inside the list of post_logout_redirect_uris (check the config.yml). Second, the returnTo= parameter of the redirect needs to be added to Allowed Logout URLs in Auth0’s config. We have done this in the previous section. If something breaks for you, make sure to check these locations (and the returned X-Vouch-Error header).
Vouch-Proxy is working and communicating with Auth0! Next we will setup nginx as a reverse proxy sitting in front of vouch-proxy and our app.
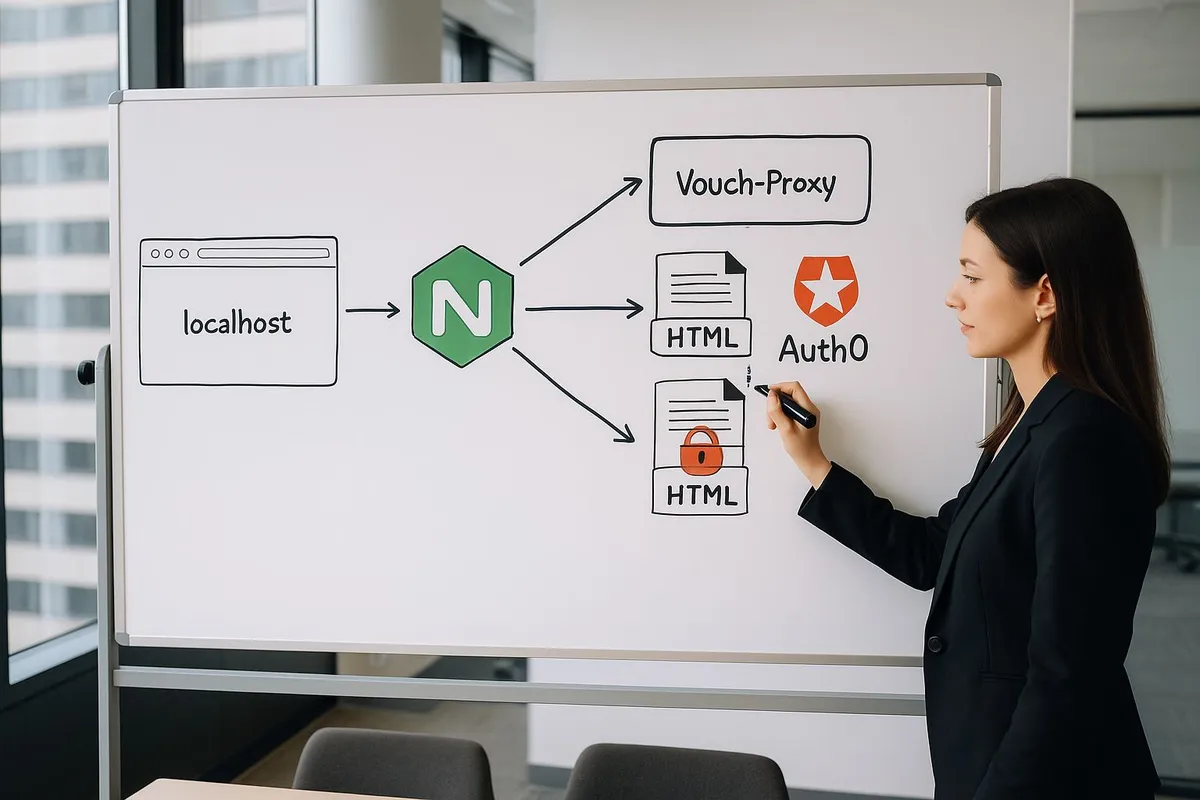
Setup Nginx
The next step in the process is to setup an Nginx server that can act as a reverse proxy for our app and vouch-proxy. For this, create a new config file at ./nginx/conf.d/server.conf filled with the configuration below
server {
  listen       80;
  server_name  localhost;

  location ^~ /sso/ {
    location /sso/validate {
      proxy_pass http://vouch:9090/validate;
      proxy_set_header Host $http_host;
      proxy_pass_request_body off;
    }

    location = /sso/logout {
      proxy_pass http://vouch:9090/logout?url=https://your-project-name-here.eu.auth0.com/v2/logout?client_id={client_id_from_auth0}%26returnTo=http://localhost/;
      proxy_set_header Host $http_host;
    }

    proxy_set_header Host $http_host;
    proxy_pass http://vouch:9090/;
  }

  # uncomment this to forward static content of vouch-proxy
  # used when running vouch-proxy with `testing: true`
  location /static/ {
    proxy_set_header Host $http_host;
    proxy_pass http://vouch:9090/static/;
  }

  location / {
    root   /usr/share/nginx/html;
    index  index.html;
  }
}
Also, upate the docker-compose.yml like so
version: '3'

services:
    vouch:
        image: voucher/vouch-proxy
        volumes:
            – ./vouch/config/config.yml:/config/config.yml

    nginx:
        image: nginx
        depends_on:
            – vouch
        volumes:
            – ./nginx/conf.d/:/etc/nginx/conf.d/
        ports:
            – 80:80
and finally, update the vouch-proxy configuration to callback to the new location. For this, you only have to change the variable callback_url in the last line of the config file.
# vouch config
# bare minimum to get vouch running with OpenID Connect (such as okta)

vouch:
    logLevel: debug
    testing: true
    listen: 0.0.0.0
    port: 9090
    allowAllUsers: true

    jwt:
      secret: Your-64-character-secret-key-here
      issuer: Vouch
      compress: false

    cookie:
      name: my-vouch-ct
      secure: false
      domain: localhost

    headers:
      jwt: X-Vouch-Token
      querystring: access_token
      redirect: X-Vouch-Requested-URI
      accesstoken: X-Vouch-IdP-AccessToken
      idtoken: X-Vouch-IdP-IdToken

    post_logout_redirect_uris:
      – https://your-project-name-here.eu.auth0.com/v2/logout?client_id={client_id_from_auth0}&returnTo=http://localhost/

oauth:
    # Generic OpenID Connect
    # including okta
    provider: oidc
    client_id: {client_id_from_auth0}
    client_secret: {client_secret_from_auth0}
    auth_url: https://your-project-name-here.eu.auth0.com/authorize
    token_url: https://your-project-name-here.eu.auth0.com/oauth/token
    user_info_url: https://your-project-name-here.eu.auth0.com/userinfo
    scopes:
        – openid
        – email
        – profile
    callback_url: http://localhost/sso/auth
Now update the docker stack so that it uses the new configuration.
What has just happened? We have added another node (nginx) to our docker stack and added a configuration for a server at the default http port. The first location block (^~ /sso/) acts as a reverse proxy for vouch-proxy. It has specializations for the /validate endpoint (no body needed), and for the /logout endpoint (for convenience). All authorization calls will, hence, go to localhost/sso/.
The second location block (/static/) handles requests to vouch-proxies static files (the logo, and .css you see for 302 calls). This block is only needed when we set testing: true in the vouch-proxy config. Otherwise, the debugging website will not be shown, and we can remove this block.
The third location block is where our app will live. For now, it is the default nginx website.
Let’s test this setup. First navigate to
localhost/and make sure that nginx is up and running. Then navigate to
localhost/sso/and make sure that nginx is correctly forwarding to vouch-proxy (you should see the familiar 404 page not found). Now, test the login by navigating to
localhost/sso/login?url=http://localhost/sso/validateThis should result in the same flow that you are familiar with from the previous section, except that the URL now contains localhost/sso/ instead of localhost:9090/.
To log out simply visit
localhost/sso/logoutNotice how you are also logged out of Auth0. Nginx adds the necessary parameters before passing it to vouch proxy.
Secure your App
So far, we have setup nginx, vouch-proxy, and Auth0 in a neat docker stack and we have verified that everything is working. What we haven’t done yet is to integrate the actual app.
First, let’s create a super basic app that nginx can serve. Create a new file at ./web/index.html and fill it with a simple button to view protected content
<!DOCTYPE html>
<html>
    <head>
        <title>Simple App</title>
    </head>
    <body>
        <button onclick="location.href='/sso/login?url=http\:\/\/localhost/protected';" id="myButton" class="float-left submit-button" >View Protected Content</button>
    </body>
</html>
and also a page that requires login to view at ./web/protected/index.html
<!DOCTYPE html>
<html>
    <head>
        <title>Simple App</title>
    </head>
    <body>
        <p>This content is protected, and can't be seen without being logged in.</p>
        <button onclick="location.href='/sso/logout';" id="myButton" class="float-left submit-button" >Logout</button>
    </body>
</html>
Then, add the files to the nginx container by updating the docker-compose.yml
version: '3'

services:
    vouch:
        image: voucher/vouch-proxy
        volumes:
            – ./vouch/config/config.yml:/config/config.yml

    nginx:
        image: nginx
        depends_on:
            – vouch
        volumes:
            – ./nginx/conf.d/:/etc/nginx/conf.d/
            – ./web/:/usr/share/nginx/html/
        ports:
            – 80:80
Restart/update the stack, and you can see your website at localhost/. When clicking the “view protected content”, you will see the page that should be protected. When you click “logout” on the protected page, you will trigger the logout flow familiar from the previous sections.
To actually protect the content, we need to add a new location to nginx and protect it. This is done easily by updating the config file.
server {
  listen       80;
  server_name  localhost;

  location ^~ /sso/ {
    location /sso/validate {
      proxy_pass http://vouch:9090/validate;
      proxy_set_header Host $http_host;
      proxy_pass_request_body off;
    }

    location = /sso/logout {
      proxy_pass http://vouch:9090/logout?url=https://your-project-name-here.eu.auth0.com/v2/logout?client_id={client_id_from_auth0}%26returnTo=http://localhost/;
      proxy_set_header Host $http_host;
    }

    proxy_set_header Host $http_host;
    proxy_pass http://vouch:9090/;
  }

  # uncomment this to forward static content of vouch-proxy
  # used when running vouch-proxy with `testing: true`
  location /static/ {
    proxy_set_header Host $http_host;
    proxy_pass http://vouch:9090/static/;
  }

  location / {
    root   /usr/share/nginx/html;
    index  index.html;
  }

  location /protected {
    auth_request /sso/validate;
    root /usr/share/nginx/html;
    index index.html;

    expires 0;
    add_header Cache-Control "no-cache, no-store, must-revalidate, max-age=0";
    add_header Pragma "no-cache";
  }
}
Now, when you click View Protected Content or manually navigate to localhost/protected, you will see the protected page (if you are logged in) or (if not) you will get a 401 Unauthorized error.
Next, we can have nginx catch the error and, instead of raising it, redirect the user to the login procedure with a simple addition to the server.conf
server {
  listen       80;
  server_name  localhost;

  location ^~ /sso/ {
    location /sso/validate {
      proxy_pass http://vouch:9090/validate;
      proxy_set_header Host $http_host;
      proxy_pass_request_body off;
    }

    location = /sso/logout {
      proxy_pass http://vouch:9090/logout?url=https://your-project-name-here.eu.auth0.com/v2/logout?client_id={client_id_from_auth0}%26returnTo=http://localhost/;
      proxy_set_header Host $http_host;
    }

    proxy_set_header Host $http_host;
    proxy_pass http://vouch:9090/;
  }

  # uncomment this to forward static content of vouch-proxy
  # used when running vouch-proxy with `testing: true`
  location /static/ {
    proxy_set_header Host $http_host;
    proxy_pass http://vouch:9090/static/;
  }

  location / {
    root   /usr/share/nginx/html;
    index  index.html;
  }

  location /protected {
    auth_request /sso/validate;
    root /usr/share/nginx/html;
    index index.html;

    expires 0;
    add_header Cache-Control "no-cache, no-store, must-revalidate, max-age=0";
    add_header Pragma "no-cache";

    error_page 401 = @prompt_login;
  }

  location @prompt_login {
    return 302 http://localhost/sso/login?url=$scheme://$http_host$request_uri;
  }
}
Now, the user will be asked to log in if they try to access the protected location, and only if the login succeeds will they be able to view the protected page.
Bonus: Add HTTPS via self-signed certificates
In 2020 servers should enforce https, and while it is not necessary for localhost development, it is very nice to have. Especially later, when you have a development and production version of the code.
Adding SSH is very easy (shameless self plug). First generate a self-signed certificate for localhost (make sure to enter localhost as common name):
docker run --rm -it -v$PWD:/certs firefoxmetzger/create_localhost_ssl(Source: https://github.com/FirefoxMetzger/create_ssl)
This will place a certificate and a private key into your current working directory which you can move to ./cert/ . Also, if you don’t want to be warned about an untrusted certificate, you can consider adding it to your browser’s trusted certificates.
Next, we have to update the server.conf for nginx
server {
  listen 80;
  server_name _;
  return 301 https://$host$request_uri;
}

server {
  listen       443 ssl;
  server_name  localhost;

  ssl_certificate     /certs/certificate.crt;
  ssl_certificate_key /certs/private.key;

  location ^~ /sso/ {
    location /sso/validate {
      proxy_pass http://vouch:9090/validate;
      proxy_set_header Host $http_host;
      proxy_pass_request_body off;
    }

    location = /sso/logout {
      proxy_pass http://vouch:9090/logout?url=https://your-project-name-here.eu.auth0.com/v2/logout?client_id={client_id_from_auth0}%26returnTo=https://localhost/;
      proxy_set_header Host $http_host;
    }

    proxy_set_header Host $http_host;
    proxy_pass http://vouch:9090/;
  }

  # uncomment this to forward static content of vouch-proxy
  # used when running vouch-proxy with `testing: true`
  location /static/ {
    proxy_set_header Host $http_host;
    proxy_pass http://vouch:9090/static/;
  }

  location / {
    root   /usr/share/nginx/html;
    index  index.html;
  }

  location /protected {
    auth_request /sso/validate;
    root /usr/share/nginx/html;
    index index.html;

    expires 0;
    add_header Cache-Control "no-cache, no-store, must-revalidate, max-age=0";
    add_header Pragma "no-cache";

    error_page 401 = @prompt_login;
  }

  location @prompt_login {
    return 302 https://localhost/sso/login?url=$scheme://$http_host$request_uri;
  }
}
The new first server block will forward all HTTP requests to HTTPS. Then, we add the SSL certificate we have just generated and change nginx to listen to the standard HTTPS port. Finally, we change the protocol from HTTP to HTTPS for both redirects.
Next update the callback_url for the vouch-proxy config as well as the post_logout_redirect_uris.
# vouch config
# bare minimum to get vouch running with OpenID Connect (such as okta)

vouch:
    logLevel: debug
    testing: true
    listen: 0.0.0.0
    port: 9090
    allowAllUsers: true

    jwt:
      secret: Your-64-character-secret-key-here
      issuer: Vouch
      compress: false

    cookie:
      name: my-vouch-ct
      secure: false
      domain: localhost

    headers:
      jwt: X-Vouch-Token
      querystring: access_token
      redirect: X-Vouch-Requested-URI
      accesstoken: X-Vouch-IdP-AccessToken
      idtoken: X-Vouch-IdP-IdToken

    post_logout_redirect_uris:
      – https://your-project-name-here.eu.auth0.com/v2/logout?client_id={client_id_from_auth0}&returnTo=https://localhost/

oauth:
    # Generic OpenID Connect
    # including okta
    provider: oidc
    client_id: {client_id_from_auth0}
    client_secret: {client_secret_from_auth0}
    auth_url: https://your-project-name-here.eu.auth0.com/authorize
    token_url: https://your-project-name-here.eu.auth0.com/oauth/token
    user_info_url: https://your-project-name-here.eu.auth0.com/userinfo
    scopes:
        – openid
        – email
        – profile
    callback_url: https://localhost/sso/auth
Last, but not least, make the certificates available to nginx, by mounting the folder into the nginx container and open port 433 to allow SSL connections.
version: '3'

services:
    vouch:
        image: voucher/vouch-proxy
        volumes:
            – ./vouch/config/config.yml:/config/config.yml

    nginx:
        image: nginx
        depends_on:
            – vouch
        volumes:
            – ./nginx/conf.d/:/etc/nginx/conf.d/
            – ./web/:/usr/share/nginx/html/
            – ./cert/:/certs
        ports:
            – 443:443
            – 80:80
Now, when you update the docker stack, you should be able to navigate to https://localhost (potentially receive a warning that the certificate could not be verified), and browse your app encrypted.
Remove Debugging
The only thing left is to remove some of the config that we have introduced for debugging purposes.
First, in the settings for the Tenant at Auth0, remove the uneeded allowed callback and logout URLs
Then, disable debug logs and testing mode in vouch-proxy.
# vouch config
# bare minimum to get vouch running with OpenID Connect (such as okta)

vouch:
    listen: 0.0.0.0
    port: 9090
    allowAllUsers: true

    jwt:
      secret: Your-64-character-secret-key-here
      issuer: Vouch
      compress: false

    cookie:
      name: my-vouch-ct
      secure: false
      domain: localhost

    headers:
      jwt: X-Vouch-Token
      querystring: access_token
      redirect: X-Vouch-Requested-URI
      accesstoken: X-Vouch-IdP-AccessToken
      idtoken: X-Vouch-IdP-IdToken

    post_logout_redirect_uris:
      – https://your-project-name-here.eu.auth0.com/v2/logout?client_id={client_id_from_auth0}&returnTo=https://localhost/

oauth:
    # Generic OpenID Connect
    # including okta
    provider: oidc
    client_id: {client_id_from_auth0}
    client_secret: {client_secret_from_auth0}
    auth_url: https://your-project-name-here.eu.auth0.com/authorize
    token_url: https://your-project-name-here.eu.auth0.com/oauth/token
    user_info_url: https://your-project-name-here.eu.auth0.com/userinfo
    scopes:
        – openid
        – email
        – profile
    callback_url: https://localhost/sso/auth
And update the nginx config by removing the /static/ route.
server {
  listen 80;
  server_name _;
  return 301 https://$host$request_uri;
}

server {
  listen       443 ssl;
  server_name  localhost;

  ssl_certificate     /certs/certificate.crt;
  ssl_certificate_key /certs/private.key;

  location ^~ /sso/ {
    location /sso/validate {
      proxy_pass http://vouch:9090/validate;
      proxy_set_header Host $http_host;
      proxy_pass_request_body off;
    }

    location = /sso/logout {
      proxy_pass http://vouch:9090/logout?url=https://your-project-name-here.eu.auth0.com/v2/logout?client_id={client_id_from_auth0}%26returnTo=https://localhost/;
      proxy_set_header Host $http_host;
    }

    proxy_set_header Host $http_host;
    proxy_pass http://vouch:9090/;
  }

  # uncomment this to forward static content of vouch-proxy
  # used when running vouch-proxy with `testing: true`
  #location /static/ {
  #  proxy_set_header Host $http_host;
  #  proxy_pass http://vouch:9090/static/;
  #}

  location / {
    root   /usr/share/nginx/html;
    index  index.html;
  }

  location /protected {
    auth_request /sso/validate;
    root /usr/share/nginx/html;
    index index.html;

    expires 0;
    add_header Cache-Control "no-cache, no-store, must-revalidate, max-age=0";
    add_header Pragma "no-cache";

    error_page 401 = @prompt_login;
  }

  location @prompt_login {
    return 302 https://localhost/sso/login?url=$scheme://$http_host$request_uri;
  }
}
Done! Now you have a simple app that is secured with Auth0 and vouch-proxy. You can add an API to this in the same way we have added the /protected route. Simply add
auth_request /sso/validate;to the route that proxies the API.
Thanks for reading and Happy Coding!